Thursday 31 December 2015

Two thousand and fifteen

Here we are... Yet another 'year in review' post. These are all over the place at the moment. Yet they have an irresistible draw which has sucked me in good and proper. This is actually my second end of year post, but my first on this blog. Last year I reflected on the things I had succeeded in and the things I planned on doing during 2015. These plans have been looming over me like an essay that's due in next week (which I haven't even started the reading for). I have not completed the jacket in my to do list, or made one little shirt. But I have made shed loads of things, most of which I am very proud of. 
So this year I will take another look at what I've accomplished this year... Cue the collages!

I've attempted to put the photos in order of when they were completed, but I may have been a little less than accurate.

I finished my first jumper this year, my very first wearable knit... Which I have never worn!! I'm very proud of it, but it's just too short (sleeves too) to be warm and too thick to be a summer top. I have many times considered frogging it, but I'm a sentimental fool, and this is my very first jumper!

I also made a jersey dress which, while the waistband sits too high, this one has been worn a lot! I also added more wardrobe staples with two skirts (from a vintage pattern.. Which was as close as I got to my 3 pattern vintage pledge), and Colette's Aster blouse. I also made my first knitted lacework shawl for Mother's Day (she wore it a lot when I visited at Christmas so she seems to really like it), and moved on from that to a lacework jumper, my first colour work knit! Wow I was crushing those 'firsts in knitting.


Speaking of which.. My first socks!! Which I love! Another Aster made in Liberty cotton lawn, which I just wore the life out of, a birthday dress and an alpaca shrug which is super cosy.


I did some colour blocking with black sleeves (ok not 'proper' colour blocking, but really effective). Dad got my second ever pair of socks for Father's Day. I hand drafted a box pleated skirt using novelty (squirrel) print cotton for the first time (another first!)
What really surprised me is that I made in awesome shirt dress (McCalls 6696) and took it on holiday and love it and love it... But I never blogged it!! I just never got round to it as I moved straight on from that to making the dress and jacket I wore to my brothers wedding. I'm proud of the dress (my first fully lined dress!!) but I am so super proud of the jacket. Ok it's not the one I planned last year, but I made a jacket!!


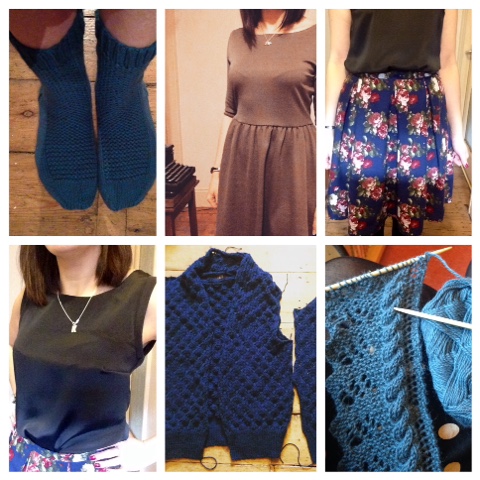
Upon returning from the wedding I set about knitting socks for my whole family as Christmas gifts (I haven't got round to making a pair for myself yet but I totally want some). I also made my first Monetta (first time I gathered a skirt using clear elastic), which I confess has never made it out of the house, I'm just not feeling the brown colour and feel a bit dowdy in it.
I also sneaked in a skirt and blouse to wear at my works Christmas party, it was a self drafted box pleat again and I re used a pattern for the blouse, no firsts there.

So they are all of my completed works in 2015, except for the last two, I only just finished them and have no photos of the finished cardigan or shawl, but I'll show you them soon... Promise.

As far as resolutions for next year go, I would love to participate in me-made-may and hope to have a few more staples in the wardrobe for that. 
I am also going to really focus on making wearable comfortable clothes by learning more about fitting. I think I've been quite lucky so far, but I find it annoying that some things are too tight here and too loose there. But one of the huge benefits of me-mares are that their fit is proper and flattering. So there is my task.

So on that note, happy new year, I hope 2016 is full of all good things and plenty of time to make stuff
Xx


Monday 28 December 2015

Christmas gift sewing

Sewing gifts is something I have done in the past, but something I very rarely ever do. In fact I think the last gift I sewed was a cushion for my friend...


This little fella I made about four years ago, when my sewing skills were very hit and miss. I still love him though, as does my friend. 

When I was making my Christmas lists back in November I came across a great idea on Pinterest (and people wonder why I spend hours on there... It's for gift ideas... Obviousy!)


I thought it would be a great idea to make one for my sister for her Christmas box. She used to draw and paint all of the time, but apart from her rather spectacular nail art, she doesn't have much opportunity for arty stuff now.
Looking at the pinterest version I thought it would be fairly easy to make one out of a square of fabric folded over with some pencil pockets sewn in... So I set about finding a suitable square of fabric. It is a well known fact that Christine loves dogs, and look what I found on eBay!!


Doggy quilting cotton!! For the lining I decided to recycle some triangles of fabric that we had used to make bunting for my sisters friends baby shower (Chris really enjoyed the bunting factory we set up that day). So I patch worked some purple spotty triangles, and none of the triangle points matched up!! I like to call it quirky rather than crap. 

Adding some extra quilting cotton (white) for bulk I simply put right sides together, flipped it inside out, and slipped in some ribbon when I closed the final side (to fasten the roll). Folded up the bottom half (upside down doggies) and stitched pocket lines... And voila!


I photographed it upside down right before I wrapped it, so poor photos are the result.


I made the large pocket bigger than the sketch book I bought so she can replace it when it's full. The colour pencils are watercolour ones, so she can be extra arty, and the graphite ones are a couple of bs so... Again... Extra arty. The only issue I have with this design is that if you tip it upside down all the pencils fall out! If I made this again I'd have to think of a solution for that.


She absolutely loved it... So I got extra sister points this year (because of the socks too). She bought me a tea set from one of my favourite tea shops with a tin of 'Christmas in a cup' tea... So she got bonus sister points too!!


Sunday 27 December 2015

Christmas gift knitting

Around this time last year I set out my goals of 2015, one of which was to learn how to knit socks. I achieved this goal in April when I made my first pair of little, slightly wonky, ankle socks.


After I'd succeeded with these I decided that my Christmas gift knitting would be socks. I planned four pairs for my brother and sister and their other halves, and I also decided to begin them much earlier than I began my gift knitting last year! So at the end of October I selected my pattern ('Rye' which can be found for free on Ravelry - I love my free patterns) and decided to use some stash yarn (of which I can't remember the brand as it's been there forever, but it is a green Aran polyester).


The first pair flew off the needles surprisingly quickly, thanks to the Aran weight I suspect. The pattern is great! It's really easy to follow and has a really simple and effective design with its panel of garter stitch running down the front. My gauge was out by quite a bit, but after recalculating for the correct size (provided on the pattern) it turned out I just needed to follow the pattern for a size smaller than was needed. Yay! Easy calculations.

Me trying on pair #1

I managed to finish the pair for Phil and Maeve in good time to post them over to Ireland which I felt very smug about. And pair #3 and #4 were finished by the end of November. So I decided to go a bit nuts and also make some for my other half and my parents too..


So seven pairs of socks later (I was knitting right up to my deadline of my trip south to stay with my parents) and everyone gets matching Christmas socks. Because I felt so proud of my collection I began to think up creative ways of presenting them.. So I created labels...


These were very simply typed out in word, printed and folded to size. I also added a few stitches of either pink or blue yarn on the ankle just under the ribbed band. I figured it would be easier to identify them as the girls and boys all got identical pairs. Otherwise there would have been pairs of one big one smaller socks, which is simply silly.


I used the label for washing instructions, and have called them 'Kat Knits' in honour of my great Aunty Kit (great as in my grandads sister, not just because she was fantastic... She was pretty great though), she used to create hand knitted jumpers for us (all my cousins) every year when we were kids, they were lovingly known as Kit Knits.


On Boxing Day I was really pleased that people appeared in the morning wearing their new socks, these feet belong to my other half. I found it very funny that he sat next to me on the sofa each night as I churned them out, but never noticed me making his pair!!


Yes I shall be making socks again, they make people dance, except for my dad... Who did dance just after this photo, even though he really doesn't look amused.... He he


Friday 18 December 2015

Unexpected knitted goods

I'm visiting my parents at the moment. Although they are northern they both currently live in the south. I love visiting them, the area is beautiful (Wiltshire has a lot of Neolithic history just lying around all over the place). Today I went to visit Avebury Henge with my dad, and we decided to stop off at a beautiful pub afterwards for some mulled goodness. Right next to our table on the windowsill I found these little guys...


They had a knitted nativity scene!! (Try saying that after a mulled wine or two!) I loved it so much I wanted to share it with you


The Kings came out a bit blurry I'm afraid


But check out the little sheep!!!

I love finding little gems like this.


Thursday 17 December 2015

Party outfits

I'm sure there are a substantial number of people out there who can remember the sheer excitement and anticipation of the Christmas party season when they were little. When I was a kid I was really lucky and had the school Christmas party, as well as the parish Christmas party (held in the local catholic club where they always made a foil clad Santa grotto in the youth wing!). This of course meant a new party outfit! Special clothes saved just for these two parties and Christmas Day, it still leaves a warm and fuzzy feeling thinking about it.

Photo courtesy of Christmas 1984 (I was 3, Chris was 5), back in the days when having a big sister often meant nearly matching outfits! Good times!

This year I was actually able to go to my work Christmas party, usually I'm visiting family when they have it, this year it was early! And me being me, I decided that my party outfit must be handmade! 
Usually I would head for the dress patterns and pick a suitable fabric from either what I had, or online shopping. This year I already had some beautiful fabric I wanted to use, but I didn't have enough for a dress. I'd bought it planning a blouse/shirt type thing, but when it turned up it felt like water. I mean the drape on this stuff is just gorgeous!


So I resolved that it should be a skirt! A lovely swishy swooshy skirt. I decided to line it to give it a bit more volume, and to recreate the pleated skirt I had made in the summer with my squirrel cotton. It didn't entirely go to plan, the pleats are a bit mix and match, but they are a good 90% even (oops) and the pattern covers any indiscretions (phew). The lining (added as an interlining) was intended to avoid the water texture being too much of an issue, which really helped, and I think it gives an excellent result.

Dramatic lighting is a must for a close up don't you think

Of course to go with this I wanted to make a drapey blouse to tuck in. I decided on using a crepe de chine (more water fabric... Oh goodie), and a pattern I've used before.

You may recognise me from such tops as the grey checked one from summer. Now appearing in top left option, because I can't remember the letter.

 I wanted to add self drafted tulip sleeves, but after installing sleeve one I realised how much of a bad idea it was. It was so bad I couldn't bring myself to show you the fail (mental note, actually pay attention to the fabric you're using). So the sleeves are a small rectangle of fabric folded back onto the sleeve cap. I kind of made it up as I went along.


I must admit I'm not hugely in love with the blouse. It served its purpose, but if I'd had time I would have scrapped the crepe in favour of a light cotton lawn. These thoughts were reinforced by the fact the skirt was complimented quite a bit, but when I said the top was handmade too it was just sort of brushed over. I will forgive my workmates though, they were somewhat squiffy, and who could look any further than this beautiful skirt!!


Next year, even if I don't make it to the Christmas party, I think I'll still make myself some special Christmas clothes, because... Why not.

I'm really not sure why the roses lined up this way on the back... But I kinda like it!

Wednesday 2 December 2015

Colouring in


On my 'to knit' list there be owls. Not sure why that needed to be said in a 'here there be monsters... Arrrrr' kind of a voice, but hey if the eye patch fits...
Sorry where was I? Ah yes I absolutely love the 'Owls' pattern by Kate Davies (to be easily spotted doing the rounds on Ravelry).


 I have decided that this is the year that I finally get round to giving that a go. I have even decided to stash bust for this project! Go me! I have a beautiful 'Schachenmayr Boston' that I found in the bargain bin of John Lewis. It is perfect for this jumper, it's soft, squishy, and pretty close to the example jumper on the pattern. Trouble is they only had 4 balls of this yarn, and I needed another 4 balls. So I headed to the Internet to find the same brand and colour-way (00092, no fancy names here) Then I fell fowl of the dye lot issue. When I found a supplier that sold this yarn there was no option to request a dye lot, I had to just keep my fingers crossed and buy the extra balls. And what I got was...


So yeah, one is greener than the other, and in natural light, noticeably so! It would just look odd to start it in one shade then randomly change to the other... So I have been plotting, and swatching, and plotting some more.
What I want to do is start with the greener yarn at the hem, and by striping it near the colour change, to blend it in like a feature of the jumper... Because I obviously planned the whole thing this way (ahem). Doing the same with the sleeves to match the body too. This creates a sort of...

Yeah I forgot to take a photo of the actual swatch before ripping it back out (to save the yarn for the jumper itself), so here is an artists reproduction.
The swatch looks ok, everyone keep your fingers crossed for the final jumper. 

Saturday 21 November 2015

Secret pyjamas

Part of my sewing plans for winter included several Jersey dresses. Last year, after finally learning how to sew with knit fabrics, I made the 'Lady Skater Dress'. I was really pleased with this dress and wore it a heck of a lot, but it had its problems. The fabric I used shrunk after several washes, which meant the bodice was quite short and the waist sat too high. But I couldn't quite get the hang of the way the skirt hung, I wasn't convinced it was very flattering on me. So after so many people sang the praise of the Moneta pattern from Colette I thought I'd give it a try as an alternative.


The pattern comes with three sleeve options and two collar options.... But you can download a pack with about a million other collar variations for free, so there is oodles of choice. I launched straight into making a wearable muslin by cutting a medium and the only alteration being to take an inch off the bodice length.


In my opinion this dress has a much better shape than the Skater dress does, there is a much more defined waist which I really like. And when I say it's an easy make I mean super lemon squeezy kind of easy! The only problem I encountered was that the back bodice piece wouldn't fit on the fold of my fabric length so I have a seam where a seam should not be.


But check it out, you can barely see it (on my rather fuzzy photos, my camera only focuses when it pleases). The fabric I used is a ponte Roma jersey in 'fawn', though I'd call it a caramel brown. It's a really beautiful fabric which has drape, but also manages to hold shape nicely. It was a bit risky using this as my wearable muslin, but I was far too impatient to do a practice run.
The pattern itself is great. It has details on the best way to work with knits and detailed descriptions of how to do the shirring for the waist. I've never done this before and I'll admit mine was rather messy. It's done using clear elastic, stretching the elastic over the skirt waist and stitching straight, when the elastic is released, it's gathered like magic while still being nice and stretchy!


I do love this detail, and hopefully the more I use this skill the neater it will become. 

Well after harping on about the things I like about this pattern, it's only fair to disclose the parts that I don't like. The mid length sleeves I really feel could be a bit longer, I really do like them just past the elbow. Also, if you choose not to add a collar, the neckline is finished by simply turning over the edge and stitching. In my opinion this doesn't feel very professional, although I will admit that finished with a twin needle it still looks smart, but with a zig zag stitch I think it would be much less so.


I also think the medium is a tad too big for me, see underarm bagginess above. So to counter these little gripes next time I will be cutting the small, and adding a pretty collar from the bonus pack! Yay!

The absolute best thing about this dress though, is just how comfortable it is. I've seen it described on other blogs as secret pyjamas, and this is the most accurate description of this dress that I can think of! I'm currently wearing it curled up on the sofa, and I swear I have less comfortable tracksuit bottoms! For this reason, combined with how smart it is (it's totally a work appropriate dress!) I must have several of these dresses!


And maybe another half inch off the waistband would probably be good!


Sunday 15 November 2015

Work in progress


November seems to be turning out to be a busy month. This year (after the great mitten fiasco of 2014 - they were huuuuge) I had decided to do my Christmas gift knitting much earlier than last time, when I gave myself approximately 3 weeks to make four gifts... I know. 

Well I have my patterns picked, I have needles at the ready, I have a GIANT ball of wool to use, and upon my word am I flying though those mini projects! I mean I am seriously impressed with myself here (engage smug mode). Trouble is, with them being Christmas presents, I can't show you them.... Boooo!!
Oh ok, but just a peek!


Because I've ploughed full speed into gift knitting my other projects are suffering a little. I had hoped to have my Pomme de Pin finished by now and my owls heading rapidly for the needles, but alas, nope. It is still progressing though, if a little slower than before, mostly because it is portable. The GIANT ball of wool I mentioned earlier means the gifts must stay in the house. Mind you, I am beginning to see light at the end of the tunnel with this cardigan, there is hope yet. I have the body complete, and have just finished sleeve 1, only sleeve 2 and a ribbed edge to go people!


So nothing finished that I can actually report, but it's exciting times people!

Thursday 5 November 2015

Becoming a wardrobe architect


In 2014 the Coletterie blog began a series called Wardrobe Architect. The idea behind this was to encourage a more mindful approach to sewing clothes, to help us to think about what we need in our wardrobe rather than just sewing pretty dresses and things we would wear maybe once but would never make it into general rotation.
Wardrobe architect icon from Coletterie 

only stumbled on this when they began the second series in 2015, but very quickly read back over all of the previous entries which talked about minimizing 'stuff' in our wardrobes and working around a 'signature look'. I think I was very guilty of having all sorts of clothes, some of which I bought to match pretty much everything, but others I struggled to put together. I remember thinking about what I would wear for work the next day and thinking "I want to wear that top, but that doesn't go with those trousers, but the only trousers it does go with are in the wash" and ending up wearing something I felt a bit rubbish in.

So over the summer I thought I would give the Wardrobe Architect approach a go. So I figured, with that feeling like a fresh start I could talk about my experiences of following this approach and how easy it has been, and how easy it is to follow the 'useful items' sewing. My aim is to have a wardrobe full of things I feel happy and confident wearing, things I feel excited about making and things I feel are really beautiful and really 'me'

The WA series has been broken down by Coletterie into different stages, the idea being that you do a different task each month. Of course as I read it all in one afternoon I've not so much worked in order as seen a task and thought 'ooh that's a good idea, I'll do that now' so I'm a bit all over the place.

I won't reiterate all of the stages here, they can all be found at Coletterie, but I will talk about the stages that I did spend time thinking about, how easy they were to do, and how they've changed the way I think about my clothes and what I make.

The 2014 series focussed mostly on being mindful of how you would like to present yourself. The first few tasks I found really helpful in planning my wardrobe/sewing projects, making me much more organised, and surprisingly more confident.

Photos from Pinterest 

This task asked you to think about what you feel happy wearing, whether you prefer smart tailored clothing, pretty girly dresses, or casual jeans. Because there's so much choice in the shops it's so easy to have a bit of everything, but this doesn't mean that we feel each look is 'us'. I found that by actually sitting and thinking about what I like to wear I realised that I'm actually very comfortable in blouses, really feel confident in dresses and skirts, and am rarely out of a cardigan. So ok, that's somewhere to start.

Once again... Pinterest 

This task I really loved! It's all about thinking about the shape of your outfit, what shapes you feel good in. It also goes quite in depth to think about details like do you prefer long or short sleeves? Do you like a low waist or a high waist? Do you like loose clothes or skintight clothes?
This is fantastic to take into consideration when choosing patterns, what's the point of buying a pattern with a drop waist and mini skirt. It might look great on the model or the hundreds of other bloggers, but I'm never going to feel comfortable wearing that. Give me a knee length dress with a big skirt and I'm happy.

Guess what... Pinterest 

I loved this task, it was all around thinking about putting outfits together when planning what you want/need to sew. This is something I am very guilty of not doing, I see an item of clothing I like and I go for it worrying about what to wear it with later on. The result, something I can only wear with one pair of jeans or no cardigan to match or just a really unusual colour/pattern that I never reach for.
I managed to identify three distinct silhouettes which I love to wear and know I feel good in. Skinny jeans with a floaty loose blouse, skirt/dress about knee length with a cardigan, and loose tailored trousers with a shirt and yet another cardigan (can you sense a theme here?).
Using these three silhouettes (one being for work) I can plan which sewing patterns to work on for the coming season. It might be that my chosen silhouettes change next season, and that's fine, I can pick new ones and new sewing projects to meet those needs


The focus of this task on the Coletterie blog was to look at your colouring (hair, skin) to see whether you suit warm or cold colours, which of these you're likely to wear, and selecting from these a neutral (beige), a mid neutral (chocolate/plum/blue) and a bright (something that would stand out). I would really encourage reading over this particular task, It is quite a useful one to use alongside tasks 2 and 3 to Actually construct a functioning comprehensive wardrobe rather than a jumble sale of stuff (unless that's the look you're going for!).
While I didn't go all out with colour charts and picking mid neutrals to match my neutrals (a bit in depth for me), I did find it a good prompt when I've bought fabric since. Now I don't just look at the pretty pattern or colours, I actually think about how it will fit in my wardrobe and which items I can make with it. It has also given me inspiration to follow a general colour 'scheme' of colours I really like to wear and which colours compliment these. I also realised how much I like navy grey and red.

So I know this has been a very long, very talky post. But I hope it's been helpful and given you an excuse to spend all afternoon reading the Wardrobe Architect post on Coletterie and see which parts you find really useful. The 2015 series went much more into developing a capsule wardrobe... But I'll come back to that later

Saturday 31 October 2015

What do you wear to a wedding?

As you may know it was my brothers wedding last week, and of course I had to make my outfit for the day. I settled on a fit and flare dress with a v neck (Vogue 8997) in a navy and cream cotton.


The pattern packet States 'easy' on the front, but this was not entirely my experience while making this dress. The whole thing is fully lined, has princess seams, and a good mile and a half of hem. Was it nuts easy to make... Was it satisfying and did it produce good results? Hell yeah!


Ok so I don't look very smug, but trust me I am. Oh and just because I know you're wondering, the light from the hall window was shining on my legs making them (and the wall behind) a shade lighter, and photoshop I cannot, so lighter they stay.
Anyway back to the dress. There are four sections to the front and the back with a high waistband but the shaping disguises this, making it a wonderfully flattering shape. The lined skirt is really full and swishy.


The back of the dress has a deep v neckline too, but just high enough, and just wide enough to still cover bra straps. I really loved this detail!


I may have mentioned the mile and a half of hem, well this thing is practically, if not actually, a circle skirt. The hemming (done with my favourite method of bias tape) took an entire afternoon! But it has twirl appeal, which is best seen on the dance floor obviously!
I cut a straight size 10 from the pattern and the only adjustments I made was to shorten the bodice at the shoulders.


This was necessary as if not my dignity was in question from the rather low neckline. I lined the bodice with the same materiel as the rest of the dress, but used navy lining fabric for the skirt. Hand stitching the lining to the bodice was a pain, but worth it so it doesn't show on the outside.
To go with the dress, and because the wedding was in October... In Ireland... I needed a warm and very smart jacket. I decided on New Look 6799, ignoring the example picture which is awful, I thought would be great for the wedding outfit.


I found a lovely navy boucle online and came out with...


Which I am very proud of, even though it was a bit of a headache to make. I had researched using boucle online and had decided on a Channel type of construction, the main feature of this being the lining quilted to the outer. This means the boucle holds its shape really well and looks more tailored. I made a sample by quilting the two fabrics using my sewing machine, which left the fabric feeling really flimsy and thin. To create a warmer jacket I used a layer of thinsulate, this unfortunately looked really awful machine quilted so I was forced to hand quilt each pattern piece


This meant pinning it to follow the natural lines on the fabric, then hand stitching each line from the reverse... It took aaaaaaaaaages!! I went stir crazy before I even got to the sleeve part. But because of this long process the stitching (while still a bit visible) blends in very nicely on the right side.

It was also important to bear in mind the loose weave on the boucle fabric and its tendency to unravel I cut the pattern with an extra half inch border, and every seam and every edge was bound with bias tape (in a lovely soft and pliable satin), which also took some time, but was really worth it.


Each edge, cuff, and hem was closed with bias tape and hand stitched on the inside (more hand stitching... Yay!!) so the whole effect is just really neat and sharp. Because I didn't want to risk making button holes and cutting into (unravelling) the fabric I used press studs, which I finished off on the outside with some lovely vintage buttons.


And I shall leave you with some action shots at the wedding, top right outside the church with my sister (it rained), you can see my mums amazing skirt and her own handmade jacket bottom right. It was a beautiful day.